As fall arrives across Canada, homeowners prepare their properties for the upcoming winter. While much of the focus goes toward insulating home envelopes or cleaning exterior siding panels to maintain energy efficiency, hardscaping elements require equal attention. Your asphalt driveway endures some of the most intense environmental stress on your property, bearing the weight of passenger vehicles while directly exposed to sub-zero cold, snow, and rain.
Preparing an asphalt surface for a northern winter requires proactive care before the ground freezes solid. Small hairline cracks, unchecked water pooling, and failing edge supports quickly develop into deep potholes and structural sinkholes during seasonal freeze-thaw cycles. Following a systematic fall driveway maintenance checklist protects your hardscaping investment, maintains curb appeal, and ensures smooth snow clearing all winter long.
The Quick Edit
- Freeze-Thaw Defence: Sealing summer hairline cracks with hot-pour rubberized filler prevents water from expanding inside the sub-base during winter.
- Chemical Protection: Choosing asphalt-safe de-icers like calcium chloride prevents chemical degradation caused by harsh rock salts.
- Plow Preparation: Setting flexible driveway markers along edges protects asphalt borders from plow blade gouges and turf scalping.
Understanding the Canadian Freeze-Thaw Threat to Asphalt
Asphalt is a flexible pavement consisting of aggregate stone, sand, and liquid bitumen binder. During warm summer months, asphalt retains elasticity, expanding and flexing under vehicle weight. However, as fall temperatures drop toward freezing, bitumen stiffens and becomes brittle.
The primary enemy of asphalt pavement during a Canadian winter is the freeze-thaw cycle. When fall rain flows across the driveway, water penetrates surface pores and hairline cracks, settling inside the aggregate gravel sub-base beneath the pavement.
As temperatures drop below zero degrees Celsius, trapped water freezes and expands by approximately nine percent. This internal expansion exerts immense pressure against the brittle asphalt shell, fracturing surrounding aggregate and pushing pavement upward. When temperatures rise during brief thaws, the ice melts, leaving empty hollow voids beneath the surface. Subsequent vehicle weight collapses the weakened asphalt into those voids, forming severe potholes and surface rutting by early spring.
Step 1: Performing a Thorough Fall Surface Inspection
Before applying any sealants or repair compounds, complete a thorough visual inspection of your entire driveway surface. Identifying structural issues early allows you to complete repairs while ambient temperatures remain warm enough for materials to cure properly.
Focus on several key structural indicators during your fall driveway walkthrough:
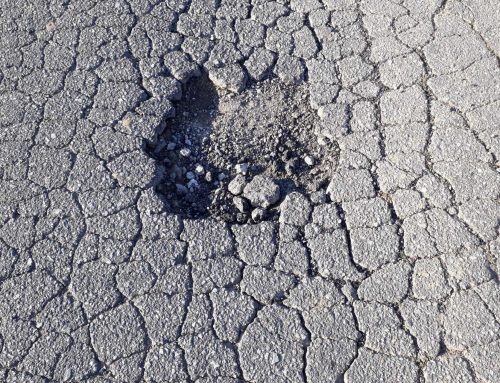
- Spiderweb or Alligator Cracking: Interconnected networks of small cracks resembling alligator skin indicate sub-base failure caused by heavy vehicle loads or poor drainage.
- Linear Longitudinal and Transverse Cracks: Single long cracks running parallel or perpendicular to the driveway direction indicate natural temperature expansion and contraction.
- Edge Ravelling and Cragging: Crumbling asphalt along lawn borders signals a lack of lateral support or damage from heavy lawnmower wheels during summer.
- Oil and Fuel Stains: Dark spots from automotive fluid leaks soften bitumen binders, causing asphalt aggregate to strip away from the surface.
Identifying these issues early allows you to select the correct repair materials before cold weather halts exterior home projects.
Step 2: Cleaning, Degreasing, and Washing the Pavement
Proper surface preparation is mandatory for driveway repair products to bond effectively. Applying sealants or crack fillers over loose dirt, leaves, or automotive oil results in premature peeling and failed seals.
Begin surface cleaning by sweeping away fallen autumn leaves, pine needles, and loose gravel using a stiff-bristled outdoor broom. Next, apply a specialized biodegradable asphalt degreaser to petroleum stains. Scrub oil spots thoroughly with a wire brush to lift embedded grease, then rinse the area with clean water.
Finally, power-wash the entire driveway surface using a wide fan-spray nozzle. Direct high-pressure water into cracks to flush out packed soil, weed roots, and loose aggregate. Allow the driveway to dry completely for twenty-four to forty-eight hours before applying joint fillers or sealcoats.
Step 3: Filling Cracks with Hot-Pour Rubberized Fillers
Filling open surface cracks before winter arrives is the single most crucial step in driveway preservation. Cracks wider than a quarter-inch allow large volumes of water to reach the sub-base, accelerating structural collapse.
To complete effective pre-winter crack repairs, select a high-grade rubberized asphalt crack filler:
- Cold-Pour Liquid Fillers: Ideal for small hairline cracks under one-quarter inch wide. These flexible liquid acrylic compounds pour straight from the bottle, filling narrow voids quickly.
- Hot-Pour Rubberized Fillers: Recommended for major cracks between one-quarter and one inch wide. Heated commercial rubber compounds melt into deep crevices, forming a resilient, watertight seal that expands and contracts during extreme temperature shifts.
- Deep Void Backer Rods: For cracks exceeding one inch in depth, insert foam backer rod rope into the crevice before applying sealant. The foam rod fills deep voids, preventing expensive sealant from sinking too far down.
Completing rubberized crack filling before late-season rains arrive prevents sub-base water saturation, ensuring you extend the driveway’s lifespan by several years.
Step 4: Applying Protective Surface Sealcoat
Sealcoating provides a protective barrier against moisture, automotive fluids, winter road salt, and ultraviolet radiation. While crack filling repairs structural breaks, sealcoating protects the surrounding bitumen matrix from drying out and crumbling.
Applying a protective sealcoat during early-to-mid autumn requires monitoring weather conditions carefully. Most commercial asphalt emulsions require ambient temperatures above ten degrees Celsius for at least twenty-four hours to cure correctly.
When sealcoating your driveway, keep these practical application tips in mind:
- Choose Asphalt Emulsion Formulas: Modern asphalt emulsion sealers are environmentally friendly, low in volatile organic compounds (VOCs), and provide strong flexibility against northern cold.
- Cut in Edges First: Use a wide paintbrush or small hand roller to apply sealer along house foundations, garage door thresholds, and concrete walkways to avoid staining adjacent structures.
- Apply Thin, Even Coats: Use a rubber squeegee or specialized driveway applicator brush to spread sealant evenly. Two thin coats provide significantly better durability and traction than one thick, heavy application.
Allow forty-eight hours of drying time before parking vehicles on a freshly sealcoated surface.
Step 5: Preparing for Snow Removal and Winter De-Icing
Completing physical repairs is only half the battle; preparing your hardscaping for winter snow clearing prevents costly plow blade damage. Adding snow prep tasks to your fall home checklist completes these must-do maintenance tasks before winter storms arrive.
Marking driveway borders using flexible fibreglass snow stakes is essential for visibility during night storms:
- Install Stakes Early: Insert reflective fibreglass stakes every ten to fifteen feet along driveway borders before the ground freezes solid.
- Mark Edge Obstructions: Place double stakes around catch basin grates, retaining walls, electrical utility boxes, and garden borders to guide snowplow drivers safely.
- Choose Pavement-Safe De-Icers: Avoid applying traditional rock salt (sodium chloride) on fresh asphalt, as salt accelerates freeze-thaw damage. Instead, select calcium chloride or magnesium chloride pellets, which melt ice safely at sub-zero temperatures while remaining gentle on pavement.
Homeowners should exercise caution when using salt on their asphalt driveway, as improper chemical application damages pavement binders and causes surface pitting over time.
Long-Term Equity and Curb Appeal Benefits of Driveway Maintenance
Investing time and effort into autumn driveway preparation yields financial returns far beyond immediate winter protection. In the Canadian real estate market, a home’s driveway serves as a focal point of its initial curb appeal, setting the architectural tone for the entire property. A neglected asphalt surface marked by webbed cracks, sunken ruts, and crumbling edges signals deferred maintenance to prospective buyers and real estate appraisers alike. Conversely, a smooth, deep-black, well-sealed driveway communicates exceptional property care and structural integrity.
By spending a small fraction of the cost of a full asphalt replacement on annual autumn maintenance, homeowners preserve their underlying aggregate sub-base and avoid premature paving overhauls. Shielding the pavement from harsh seasonal elements protects the underlying investment, preventing costly structural repairs down the road. Ultimately, maintaining a pristine driveway directly enhances the overall market value and long-term equity of your estate.
Fall Action Protects Winter Hardscaping
A well-maintained asphalt driveway withstands harsh northern winters without developing severe cracks or potholes. By inspecting surfaces, filling open cracks, applying protective sealcoats, and preparing for snow removal, homeowners preserve structural integrity and maintain high curb appeal. Taking action during autumn keeps your driveway smooth, durable, and safe throughout the entire winter season.